

Deno recently launched their support for npm modules, now you can directly use these modules in a Deno project.
I think it’s a great way to increase the adaptability of Deno
Deno has a lot of QoL changes built-in and I have enjoyed working in this environment every time I do.
It comes built-in with a linter, formatter, and with TypeScript support. No more installing 2-3 separate plugins for all of these.
So, let’s begin with creating a Deno project and using Express to run a server.
You need at least Deno 1.25 to use npm modules, so check that by doing
You can check the version or upgrade the Deno by running these commands
$ deno -V
deno 1.25.1

$ deno upgrade
You can run deno fmt to format the code at any point. No need to set up anything for that.
Project Setup
Now create a new folder, you can name it anything, e.g. deno-express
Create a new file in this folder called server.ts
Import the express package
import express from "npm:express"
No package.json, no npm install express, just get to work immediately.
Now you can use express as you would normally do in a node environment, here’s the boilerplate for that:
// initialize the Express instance
const app = express()

// Add an endpoint
app.get("/", function (req, res) {
  res.send("Hello World");
});

// Listen on port 3000
app.listen(3000);

// Log the URL in the console
console.log("listening on http://localhost:3000/");
Common Errors
If you go ahead and run this in the CLI with deno run server.ts, it will give you various errors.
Some of them are:
error: Unstable use of npm specifiers. The --unstable flag must be provided.
Add --unstable to the run command, this is still an experimental feature and is supposed to be unstable, it might not work on all npm packages either. So you need to be careful.
⚠️ ️Deno requests env access to "NODE_DEBUG". Run again with --allow-env to bypass this prompt.
Deno needs access to env variables, add --allow-env so that it can access NODE_DEBUG
⚠️ ️Deno requests read access to <CWD>. Run again with --allow-read to bypass this prompt.
Give read access to the file system
⚠️ Deno requests net access to "0.0.0.0:3000". Run again with --allow-net to bypass this prompt.
Give network access, Deno by default blocks network
For more information on the permissions list, check out the official docs
Up and Running
The final command comes out to be something like this:
deno run --unstable --allow-env --allow-read --allow-net server.ts
A lot of parameters for running a simple command, but that’s because Deno by default does not allow connecting to the network. So you need to explicitly permit it.
Now you will see listening on http://localhost:3000/ in your command line and if you go to that address you will see Hello World
This is the basics of setting up a server, you can build further endpoints from here on out.
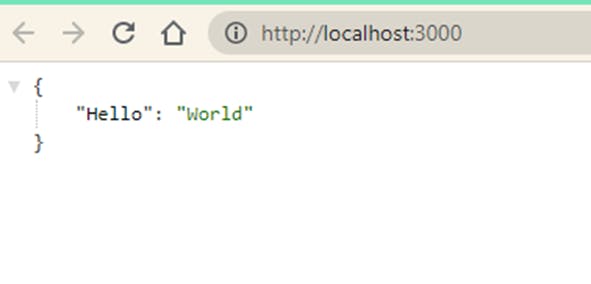
If you want to send a JSON response you can do:
app.get("/", function (req, res) {
  res.json({Hello: "World"});
});
And if you run the server again and go to the URL you will see:
Authentication!
Now to do something a bit more practical. I wanted to add Passport to authenticate users.
I wonder if I can do that or not in Deno right now.
I went over to passportjs.org/packages to see what strategy I can implement.
A strategy is just a way of implementation, for example, auth with Twitter, Facebook, and Google are all different strategies to implement authentication in your application
I imported the base passport.js with: import passport from "npm:passport"
That was pretty easy, so far so good.
Next, I chose to implement passport-http-bearer, you might have seen this kind of authentication when you send Authorization: Bearer {code} with your request.
I chose this because it had a pretty straightforward example that I could showcase here. You can check the example here.
So I imported that too:
import { Strategy } from "npm:passport-http-bearer";
I added the sample records, in the real world this will be your database
const records = [
  { id: 1, username: 'jack', token: '123456789', displayName: 'Jack', emails: [ { value: 'jack@example.com' } ] }
, { id: 2, username: 'jill', token: 'abcdefghi', displayName: 'Jill', emails: [ { value: 'jill@example.com' } ] }
];

const findByToken = function(token, cb) {
  for (var i = 0, len = records.length; i < len; i++) {
    var record = records[i];
    if (record.token === token) {
      return cb(null, record);
    }
  }
  return cb(null, null);
}
And call the passport method to insert it as a middleware:
passport.use(new Strategy(
  function(token, cb) {
    findByToken(token, function(err, user) {
      if (err) { return cb(err); }
      if (!user) { return cb(null, false); }
      return cb(null, user);
    });
  }));
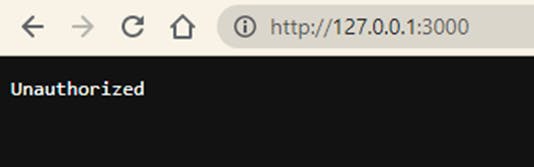
Next I tweaked the get method a little bit to accept passport authentication before it processes the body. If the user is not authenticated, it will fail and give an Unauthorized error
app.get('/',
  passport.authenticate('bearer', { session: false }),
  function(req, res) {
    res.json({ username: req.user.username, email: req.user.emails[0].value });
  });
And now we can run the app,
The moment of truth
It works!
I can do a curl or just open the link in the browser, when I go to 127.0.0.1:3000, it gives me an error:
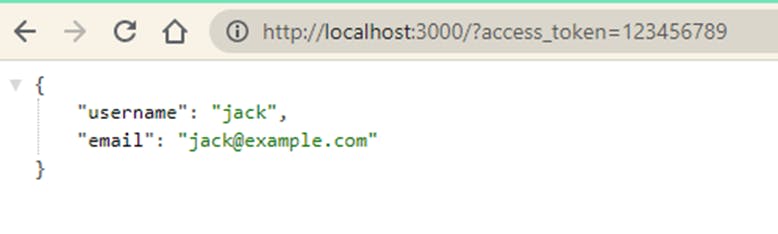
But if I add the access token to the end like http://localhost:3000/?access_token=123456789, it will return a JSON response with the auth user
Full Code
Here's the full final code, I took some liberties with adding passport so it can fit in one place, ideally, the code for passport and routes should be in separate files.
import express from "npm:express";
import passport from "npm:passport";
import { Strategy } from "npm:passport-http-bearer";

const records = [
  {
    id: 1,
    username: "jack",
    token: "123456789",
    displayName: "Jack",
    emails: [{ value: "jack@example.com" }],
  },
  {
    id: 2,
    username: "jill",
    token: "abcdefghi",
    displayName: "Jill",
    emails: [{ value: "jill@example.com" }],
  },
];

const findByToken = function (token, cb) {
  for (var i = 0, len = records.length; i < len; i++) {
    var record = records[i];
    if (record.token === token) {
      return cb(null, record);
    }
  }
  return cb(null, null);
};

passport.use(
  new Strategy(
    function (token, cb) {
      findByToken(token, function (err, user) {
        if (err) return cb(err);
        if (!user) return cb(null, false);
        return cb(null, user);
      });
    },
  ),
);

const app = express();

app.get(
  "/",
  passport.authenticate("bearer", { session: false }),
  function (req, res) {
    res.json({ username: req.user.username, email: req.user.emails[0].value });
  },
);

app.listen(3000);
console.log("listening on http://localhost:3000/");
Takeaway
So this was a small run of using Deno with npm packages, I am excited about the future of this project. If npm packages become fully operable with Deno it will surely skyrocket in adaptability.
As for myself, I have been enjoying Deno a lot because I reach for TypeScript by default and dislike the whole setup process of TypeScript, Linting, and Formatting as separate packages.
Let me know if you have worked with Deno and your reviews on it. 😊